のしメモ アプリ開発ブログ

Unityアプリとかロボットとか作ってるときに困ったこととかメモ

VRMをランタイムで読み込んでVRIKをアタッチさせる

VR向けアバターフォーマット「VRM」をランライムで読み込んで、その後VRIKにアタッチさせて動かしたかったので、手順をメモ。

VRM
VRM - dwango on GitHub

準備

VRM

UniVRM-0.40.unitypackageをインポートしておく
https://github.com/dwango/UniVRM/releases

VRIK

VRIKが必要なのでFinal IKをインポートしておく
Final IK - Asset Store

VRMモデル

下記のリンクからVRMモデルをダウンロードして、UnityのWWWクラスで取得できるパスに置いておく
「ニコニ立体ちゃん (VRM)」 / ニコニ立体 さんの作品 - ニコニ立体

実装

1. VRMをランタイムで読み込む

githubにあるRuntimeSampleLoader.unitypackageを参考に読み込み処理を実装
https://github.com/dwango/UniVRM/releases

2. VRIKをアタッチさせる

var vrIK = avatar.AddComponent<VRIK>();

3. VRIKのリファレンスを設定させる

vrIK.AutoDetectReferences();

4. エラーがでるので解除

今のままだと下記のエラーがでる

NullReferenceException: Object reference not set to an instance of an object
RootMotion.FinalIK.IKSolverVR+Arm.Stretching () (at Assets/Plugins/RootMotion/FinalIK/IK Solvers/IKSolverVRArm.cs:220)

初期化処理を入れておく

// NullReferenceエラーがでるので初期化しておく
vrIK.solver.leftArm.stretchCurve = new AnimationCurve ();
vrIK.solver.rightArm.stretchCurve = new AnimationCurve ();

5. 頭、左手、右手のターゲットを指定

vrIK.solver.spine.headTarget = headTarget.transform;
vrIK.solver.leftArm.target = leftHandTarget.transform;
vrIK.solver.rightArm.target = rightHandTarget.transform; 

6. その他微調整(任意)

// 歩幅の設定
vrIK.solver.locomotion.footDistance = 0.1f;

ランタイムでVRIKが設定できた!


(headTarget, leftHandTarget, rightHandTargetを動かすとモデルも動きます。)

最終的なスクリプト

VRMRuntimeLoader.cs

using System;
using System.Collections;
using System.Collections.Generic;
using UnityEngine;
using VRM;
using RootMotion.FinalIK;

namespace ViRD.Samples{
    public class VRMRuntimeLoader : MonoBehaviour
    {
        void Start()
        {
            // 読み込むURLを指定
            var path = "http://hogehoge/AliciaSolid.vrm";

            StartCoroutine(LoadVrmCoroutine(path, go =>
            {
                // ターゲットを仮作成
                var headTarget = new GameObject();
                var leftHandTarget = new GameObject();
                var rightHandTarget = new GameObject();
                headTarget.transform.position = new Vector3(0f, 1.5f, 0f);
                leftHandTarget.transform.position = new Vector3(-0.5f, 0.8f, 0f);
                rightHandTarget.transform.position = new Vector3(0.5f, 0.8f, 0f);

                // VRIKのセットアップ
                SetupVRIK(go, headTarget, leftHandTarget, rightHandTarget);
            }));
        }

        IEnumerator LoadVrmCoroutine(string path, Action<GameObject> onLoaded)
        {
            var www = new WWW(path);
            yield return www;

            if(!string.IsNullOrEmpty(www.error))
            {
                Debug.LogError(www.error);
                yield break;
            }
            
            VRMImporter.LoadVrmAsync(www.bytes, onLoaded);
        }

        void SetupVRIK(GameObject avatar, GameObject headTarget, GameObject leftHandTarget, GameObject rightHandTarget){

                // VRIKを設定
                var vrIK = avatar.AddComponent<VRIK>();

                // リファレンス紐付け
                vrIK.AutoDetectReferences();

                // NullReferenceエラーがでるので初期化しておく
                vrIK.solver.leftArm.stretchCurve = new AnimationCurve ();
                vrIK.solver.rightArm.stretchCurve = new AnimationCurve ();

                // 頭や腕のターゲット設定
                vrIK.solver.spine.headTarget = headTarget.transform;
                vrIK.solver.leftArm.target = leftHandTarget.transform;
                vrIK.solver.rightArm.target = rightHandTarget.transform; 

                // 歩幅の設定            
                vrIK.solver.locomotion.footDistance = 0.1f;
        }
    }
}

アルファチャンネル付き動画をモバイルで再生させる

解決したいこと

アルファチャンネル付きの動画をモバイルで再生させたい
※ 今回の手法はモバイルだけでなく他のプラットフォームでも可能ですが、動作は未確認になります。

どう再生するか

公式のVideoPlayerはアルファチャンネルつきでも再生可能ですが、WebMへの変換をしないといけません。今回はWebMへの変換をせずに再生してみます。
WebMで再生する場合は下記をご参照ください。
tsubakit1.hateblo.jp

今回はAVPro(有料Aseet)を利用し、動画とアルファチャンネルの情報を別にして変換し再生します。
これにより、アルファチャンネル自体は読みにいかなくなるので、それなりに安定して動作する…はず?
ちなみにAVProは TOP BOTTOM式、LEFT RIGHT式に対応しています。

AVProはこちら

動作確認環境

開発環境 Windows 10
Unity5.6.5p1
AVPro 1.7.5
ffmpeg 20180227-fa0c9d6 3.4.2
確認環境 Android 7.0

動画を変換する

今回変換する元の動画(スクショ)

f:id:noshipu:20180309144749p:plain

TOP BOTTOM式

変換したい動画の名前をtest.movとし、test_tb.movを書き出したい場合
下記をコマンドラインで実行

ffmpeg -i test.mov -vf "split [a], pad=iw:ih*2 [b], [a] alphaextract, [b] overlay=0:h" -y test_tb.mp4

変換後
f:id:noshipu:20180309145448p:plain

LEFT RIGHT式

変換したい動画の名前をtest.movとし、test_lr.movを書き出したい場合
下記をコマンドラインで実行

ffmpeg -i test.mov -vf "split [a], pad=iw*2:ih [b], [a] alphaextract, [b] overlay=w" -y test_lr.mp4

変換後
f:id:noshipu:20180309145332p:plain

Unityに組み込む

1. AVProをインポート
2. 変換した動画を入れる
3. 任意のオブジェクトにMediaPlayerをアタッチ
4. 変換した動画のパスをSourcePathに指定
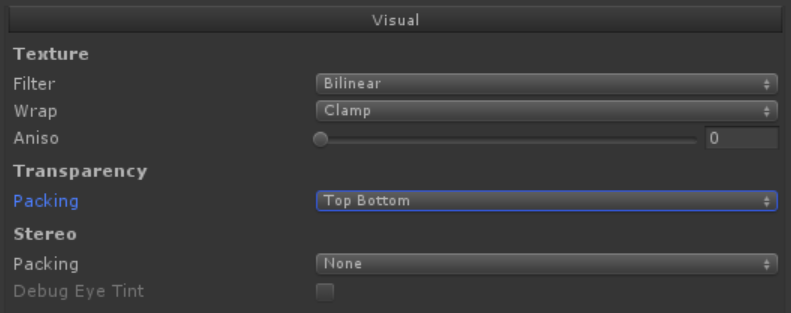
5. Visualの項目のTransparencyを[Top Bottom]、または[Left Right]に指定
f:id:noshipu:20180309145757p:plain
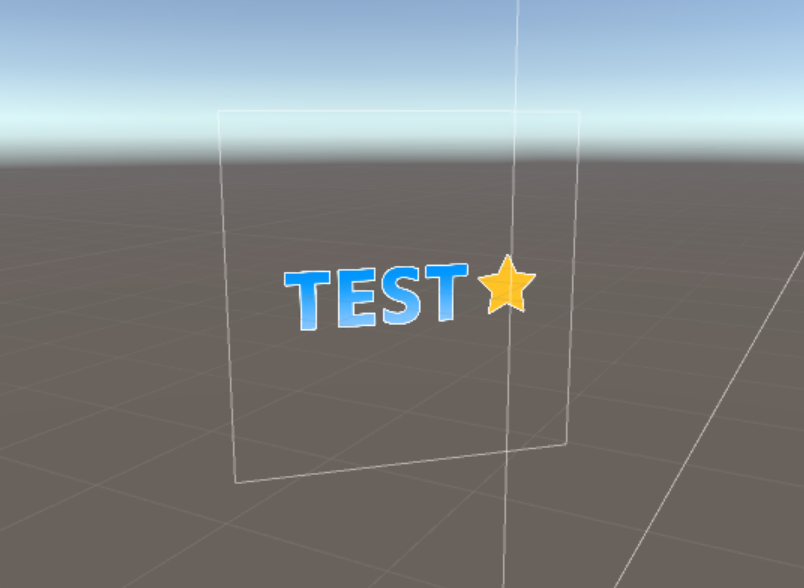
6. 任意の再生させたいMeshに適応させればモバイルでも透過した動画を再生させることができる
f:id:noshipu:20180309151138p:plain

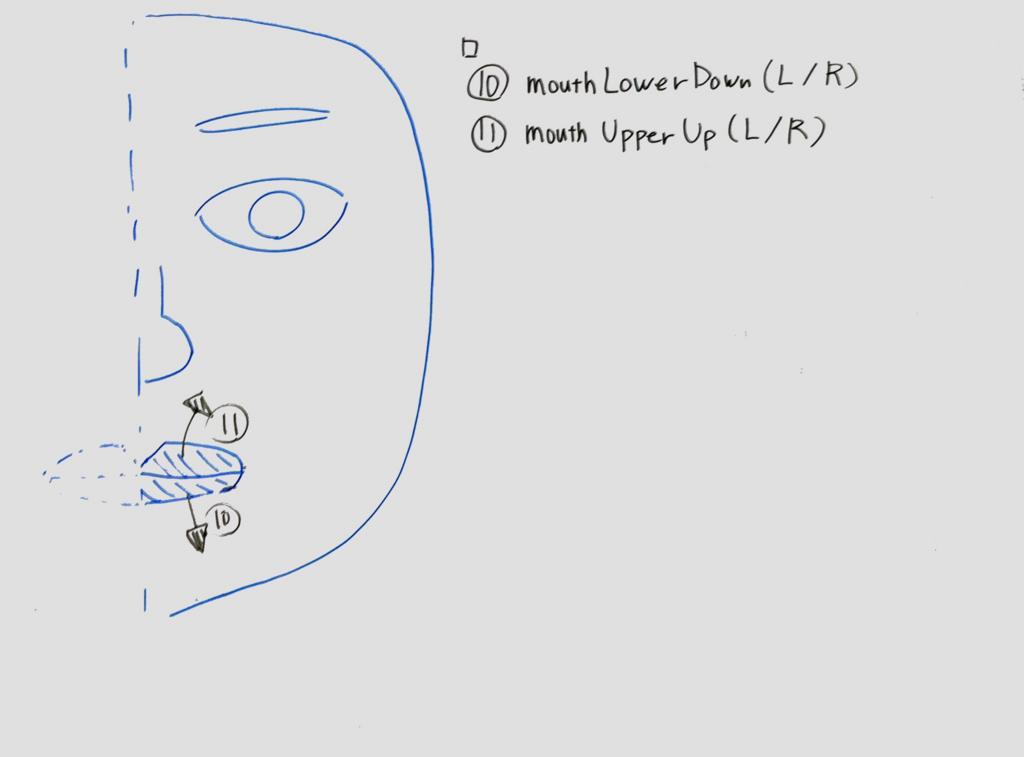
iPhoneXの表情パラメータをまとめてみた

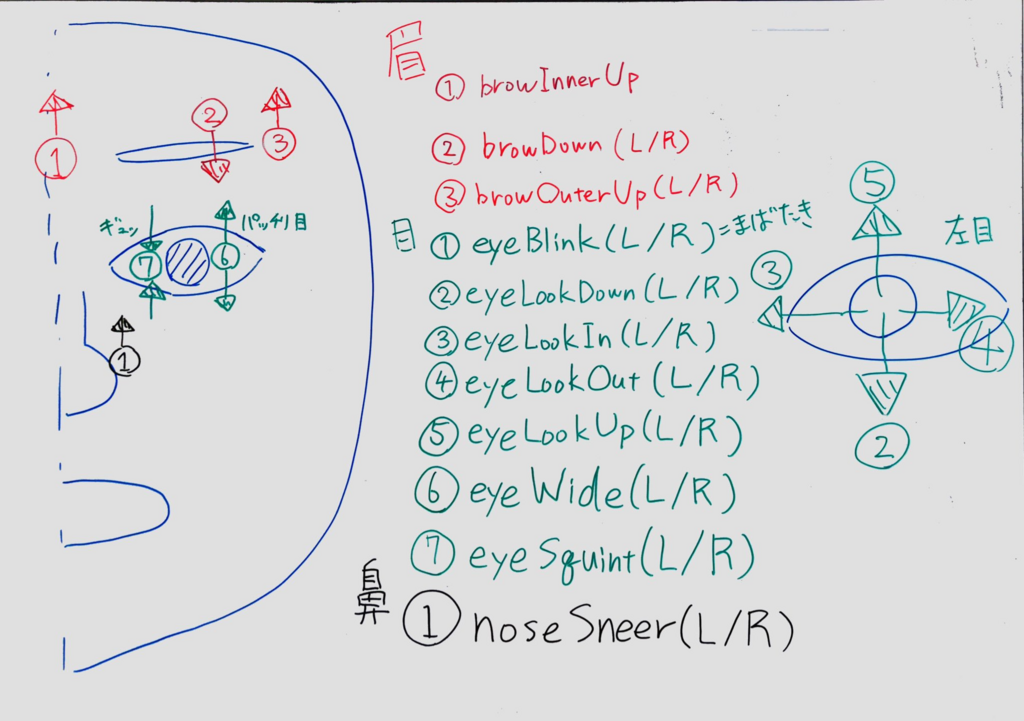
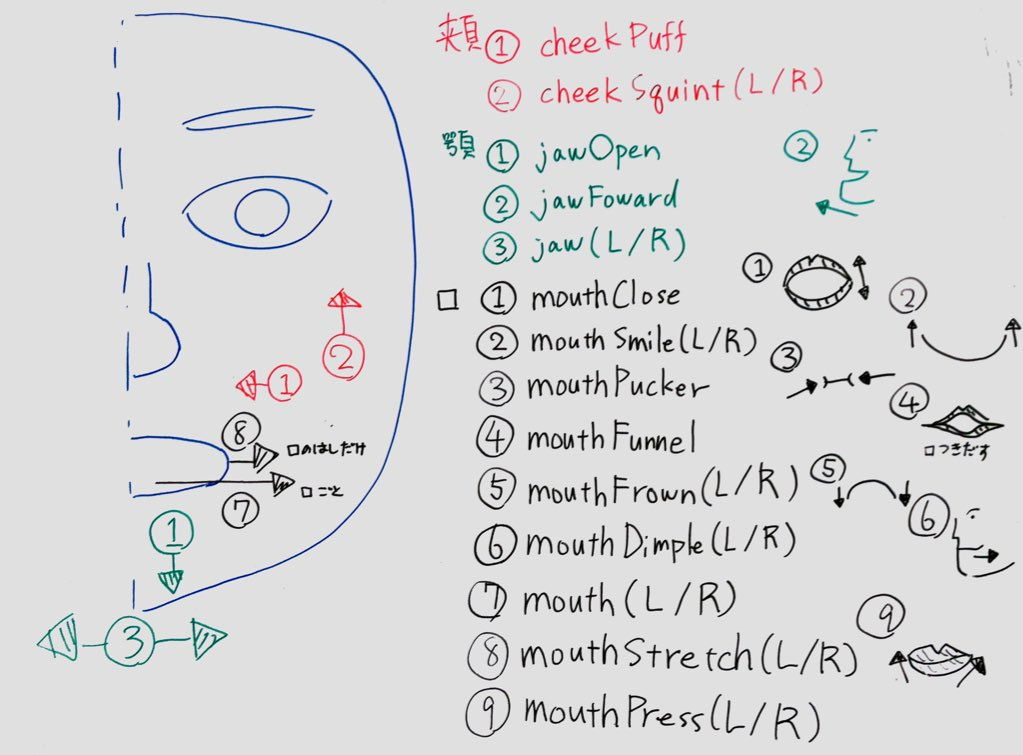
iPhone XのDepth Cameraで表情のパラメータを取得できますが、数が多くわかりにくいのでまとめてみました。

FaceTrackingのパラメータをUnityで取得する方法はこちらをご参照ください。

f:id:noshipu:20180227174633p:plain

f:id:noshipu:20180227174644p:plain

f:id:noshipu:20180227174652p:plain

まとめてみましたが、やっぱりややこしいです。

パラメータ一覧

BrowDownLeft        =   "browDown_L";
BrowDownRight       =   "browDown_R";
BrowInnerUp         =   "browInnerUp";
BrowOuterUpLeft     =   "browOuterUp_L";
BrowOuterUpRight    =   "browOuterUp_R";
CheekPuff           =   "cheekPuff";
CheekSquintLeft     =   "cheekSquint_L";
CheekSquintRight    =   "cheekSquint_R";
EyeBlinkLeft        =   "eyeBlink_L";
EyeBlinkRight       =   "eyeBlink_R";
EyeLookDownLeft     =   "eyeLookDown_L";
EyeLookDownRight    =   "eyeLookDown_R";
EyeLookInLeft       =   "eyeLookIn_L";
EyeLookInRight      =   "eyeLookIn_R";
EyeLookOutLeft      =   "eyeLookOut_L";
EyeLookOutRight     =   "eyeLookOut_R";
EyeLookUpLeft       =   "eyeLookUp_L";
EyeLookUpRight      =   "eyeLookUp_R";
EyeSquintLeft       =   "eyeSquint_L";
EyeSquintRight      =   "eyeSquint_R";
EyeWideLeft         =   "eyeWide_L";
EyeWideRight        =   "eyeWide_R";
JawForward          =   "jawForward";
JawLeft             =   "jawLeft";
JawOpen             =   "jawOpen";
JawRight            =   "jawRight";
MouthClose          =   "mouthClose";
MouthDimpleLeft     =   "mouthDimple_L";
MouthDimpleRight    =   "mouthDimple_R";
MouthFrownLeft      =   "mouthFrown_L";
MouthFrownRight     =   "mouthFrown_R";
MouthFunnel         =   "mouthFunnel";
MouthLeft           =   "mouthLeft";
MouthLowerDownLeft  =   "mouthLowerDown_L";
MouthLowerDownRight =   "mouthLowerDown_R";
MouthPressLeft      =   "mouthPress_L";
MouthPressRight     =   "mouthPress_R";
MouthPucker         =   "mouthPucker";
MouthRight          =   "mouthRight";
MouthRollLower      =   "mouthRollLower";
MouthRollUpper      =   "mouthRollUpper";
MouthShrugLower     =   "mouthShrugLower";
MouthShrugUpper     =   "mouthShrugUpper";
MouthSmileLeft      =   "mouthSmile_L";
MouthSmileRight     =   "mouthSmile_R";
MouthStretchLeft    =   "mouthStretch_L";
MouthStretchRight   =   "mouthStretch_R";
MouthUpperUpLeft    =   "mouthUpperUp_L";
MouthUpperUpRight   =   "mouthUpperUp_R";
NoseSneerLeft       =   "noseSneer_L";
NoseSneerRight      =   "noseSneer_R";

【2017年】作ったもの総まとめ

今年(2017年)に作ったものをTwitterを追いながらまとめてみる

1月

Makebox

VR Oculus Rift CV1 リリース


2016年秋ごろからコツコツ作ってたのをリリース

続きを読む